Rochelle rebuild

How many layers should I put on the stringers

  • 3- it’s epoxy

    Votes: 0 0.0%
  • 4-u can never be too safe

    Votes: 3 100.0%
  • 5-thats just crazy

    Votes: 0 0.0%

  • Total voters
    3

Longstr

New member
How to fill the gap under the tank so it’s a nice straight line when I am done??
 

Attachments

  • 4AEF3EE6-497F-4218-898A-58C93BDA4CC7.jpeg
    4AEF3EE6-497F-4218-898A-58C93BDA4CC7.jpeg
    2.7 MB · Views: 18
  • 51F65F17-4698-4CA2-AAA1-68E8BD2FDC4D.jpeg
    51F65F17-4698-4CA2-AAA1-68E8BD2FDC4D.jpeg
    2.6 MB · Views: 47
  • 8E4570E5-50C2-48E6-B6FC-24A7EAA3B407.jpeg
    8E4570E5-50C2-48E6-B6FC-24A7EAA3B407.jpeg
    2.9 MB · Views: 20

Longstr

New member
Tanks are done, I believe I just blended aluminum tanks into the floor! jump.gif
 

Attachments

  • 65CAB77D-5D84-4899-8CFE-B18A4B2B0762.jpeg
    2.7 MB · Views: 32
  • A48D02AF-9AB7-435C-B1E0-6E753CE78646.jpeg
    2.4 MB · Views: 38

Longstr

New member
Suction housing is done, this was a bitch to do in one piece
 

Attachments

  • 2525B540-B2C1-412C-A9A9-A4D17B55DB50.jpeg
    3.9 MB · Views: 18

Longstr

New member
I can officially say I am done laying glass!!! Just put down my last pieces and used every drop of resin
 

Attachments

  • 20180505_133508.jpg
    20180505_133508.jpg
    4.6 MB · Views: 42
  • 2E24561A-E4DF-42C6-9554-A3A97C084C79.jpeg
    3.4 MB · Views: 19

Longstr

New member
Got the tanks painted after church, I think they blended good into the floor.
 

Attachments

  • 8448C048-1306-47AC-9FB8-AFDF49521BDB.jpeg
    8448C048-1306-47AC-9FB8-AFDF49521BDB.jpeg
    2.2 MB · Views: 19
  • 31947270_1800590119964320_3589076956907307008_n.jpg
    31947270_1800590119964320_3589076956907307008_n.jpg
    37.4 KB · Views: 15

Crusader

Moderator
Looks fantastic Ryan, well done!

I am curious, why did you glass in your suction housing? What if you need to remove it for a repair?
 

Longstr

New member
Crusader said:
Looks fantastic Ryan, well done!

I am curious, why did you glass in your suction housing? What if you need to remove it for a repair?

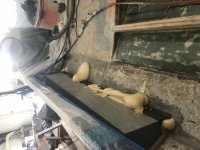
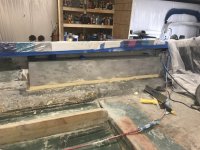
It’s an E pump, only removes from the bottom, I put a layer on everything that I put kitty hair on, used kitty hair because the texture that someone put on the boat was drastic, like 90s ceiling splatter texture, just trying to get it smooth again.
 

Longstr

New member
Sneak peak of the finished rail kit!
 

Attachments

  • 97AE6E37-0513-4857-A375-987B84840AD6.jpeg
    97AE6E37-0513-4857-A375-987B84840AD6.jpeg
    2.2 MB · Views: 48
  • C220D7E1-3ED5-41AC-BA13-E903BDBF9E28.jpeg
    C220D7E1-3ED5-41AC-BA13-E903BDBF9E28.jpeg
    2.1 MB · Views: 18

Longstr

New member
By far the worst part so far is sanding for the final finish, it’s terrible!!! I am at about 4 hrs into it maybe 2 more and it will be ready for primer, then I get to sand it again before color  crazy.gif
 

Longstr

New member
Just like unwrapping a Christmas present! Tomorrow I will mask them off and prime the rest
 

Attachments

  • 8011B9CC-77BA-4E6E-A550-E40DBB0C317E.jpeg
    8011B9CC-77BA-4E6E-A550-E40DBB0C317E.jpeg
    2 MB · Views: 19
  • 9D531CBC-B275-4BA0-BC2E-4B3FAC9FED17.jpeg
    9D531CBC-B275-4BA0-BC2E-4B3FAC9FED17.jpeg
    2.1 MB · Views: 15

Drumzilla

Active member
You should be proud .. That looks real good bud...
Capture_2017-08-15-13-46-11_crop_720x548_zpssox4vhkv.jpeg
 

Longstr

New member
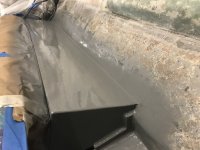
Well I prepped the whole thing and mixed my interlux epoxy primer and all hell broke loose. Directions said 3:1 reduce 25% did that.. it was like  my kids white playdoo plugged up both my guns, spent 2 hrs cleaning the gunky mess out of them, shut the damn shop light offf. Better luck tomorrow I suppose.
 
Top