Buffed out and painted the Valve covers

Crusader

Moderator
A big thanks goes out to Phil Kirkland for use of his shop and polisher.

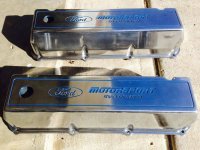
I spent a considerable amount of time buffing and polishing these valve covers......they didn't turn out half bad at all. Once polished, I spray painted the black lines and lettering with "Old Ford Blue" paint and then wiped the polished surfaces down with mineral spirits. I also cleared the covers once the lettering dried.


Attachments

  • ValveCover.jpg
    ValveCover.jpg
    105.5 KB · Views: 86

Devilman

Well-known member
Hey those look really good! I remember what they looked like from pictures you have posted in the past, you really did a number on them. They will match your engine better with the blue lettering as well, nice touch.  :smile17:
 

Crusader

Moderator
Thanks guys. Here's a picture of the valve covers when I started the project. As you can see, the bottom valve cover is taking shape after a first run with the buffer. The top cover hasn't been touched yet.


Crusader

Moderator
Devilman said:
Hey those look really good! I remember what they looked like from pictures you have posted in the past, you really did a number on them. They will match your engine better with the blue lettering as well, nice touch.  :smile17:

Thanks Kenny. Though this is under an engine cover, I still would like it to look nice.


Patchman said:
I'll have to dig out another set for you to do! :smile30: clap.gif

Lol...... ummmmmmm
 

Devilman

Well-known member
Crusader said:
Thanks Kenny. Though this is under an engine cover, I still would like it to look nice.

well hell yeah, thats part of the deal with these things. :grin: What did you use on them? Just polish, wet sanded, etc...
 

Crusader

Moderator
Devilman said:
Crusader said:
Thanks Kenny. Though this is under an engine cover, I still would like it to look nice.

well hell yeah, thats part of the deal with these things. :grin: What did you use on them? Just polish, wet sanded, etc...

I used sandpaper and progressively got to 800 grit....then I buffed it on a high speed buffing wheel using the black, red and white clay compounds to bring it to a shiny luster. Then I cleared them so i don't have to do this again. Lol.
 

Devilman

Well-known member
Crusader said:
I used sandpaper and progressively got to 800 grit....then I buffed it on a high speed buffing wheel using the black, red and white clay compounds to bring it to a shiny luster. Then I cleared them so i don't have to do this again. Lol.

I gotcha. I was using the same approach on those logs I bought, but wasn't making much progress. Turns out high speed is key, drill is too slow to do any good. Gotta run by harbor freight & get me a die grinder I suppose & get them knocked out.

Copy that on the clear, hope that does the trick, polishing aluminum sux. :cheesy: I had a set of those same valve covers and sold them after one summer, got chromed alum. instead. :grin:


Crusader

Moderator
Thanks Kenny. I used a drill with a buffing wheel on it and got nowhere. The key is to use a LOT of pressure...so much so that you'll feel worn slap out when your done. The valve covers were to hot to touch and I had to wear gloves to keep from getting burned. I spent a ton of time getting nowhere until Phil came up and said "Man, you'll get nowhere doing them like that, let me show you how to do this"......he produced a fantastic shine in a matter of seconds. Once I started using a lot of pressure......A lot of progress happened in a short period of time.

it's a dirty job too.....man is it dirty. Here's a picture of me after trying to clean my face....hope the mug shot doesn't scare you..lol.
 

Devilman

Well-known member
Ya, I bought one of those buffing kits with the felt buffers, cotton wheels & the rouge bars like you describe. Needless to say I was pretty disappointed when the chit didn't work so I just shelved it. Talked to George/Pro53 a few weeks ago about some wheels he polished out & he said pretty much the same you just did. And he said he ended up dirty as chit as well. :grin:
 

Patchman

Administrator
Staff member
Crusader said:
Thanks Kenny. I used a drill with a buffing wheel on it and got nowhere. The key is to use a LOT of pressure...so much so that you'll feel worn slap out when your done. The valve covers were to hot to touch and I had to wear gloves to keep from getting burned. I spent a ton of time getting nowhere until Phil came up and said "Man, you'll get nowhere doing them like that, let me show you how to do this"......he produced a fantastic shine in a matter of seconds. Once I started using a lot of pressure......A lot of progress happened in a short period of time.

it's a dirty job too.....man is it dirty. Here's a picture of me after trying to clean my face....hope the mug shot doesn't scare you..lol.
Who's the Hobo in your thread? That kat needs a good bath and a shave! :smile28:
 

Crusader

Moderator
Patchman said:
Crusader said:
Thanks Kenny. I used a drill with a buffing wheel on it and got nowhere. The key is to use a LOT of pressure...so much so that you'll feel worn slap out when your done. The valve covers were to hot to touch and I had to wear gloves to keep from getting burned. I spent a ton of time getting nowhere until Phil came up and said "Man, you'll get nowhere doing them like that, let me show you how to do this"......he produced a fantastic shine in a matter of seconds. Once I started using a lot of pressure......A lot of progress happened in a short period of time.

it's a dirty job too.....man is it dirty. Here's a picture of me after trying to clean my face....hope the mug shot doesn't scare you..lol.
Who's the Hobo in your thread? That kat needs a good bath and a shave! :smile28:

Hahaha.... he was a day laborer I picked up on the way to Phils shop. Lol.

 
Top